Task 7: Set Up Role Based Access Control for Oracle Database@Azure
Use role based access control (RBAC) to control user access to Oracle Database@Azure resources.
This task has instructions to set up Azure RBAC for both Oracle Autonomous Database and Oracle Exadata Database Service. Note the following:
- Pay as You Go customers only need to complete the instructions for Autonomous Database.
- Private offer customers who want to provision both Autonomous Database and Exadata Database Service need to complete both sets of instructions in this topic. Otherwise, complete the set of instructions that matches the database service you plan to use.
Autonomous Database Groups and Roles
| Azure Group name | Azure Role assignment | Purpose |
|---|---|---|
| odbaa-adbs-db-administrators |
Oracle.Database Autonomous Database Administrator |
This group is for administrators who need to manage all Oracle Autonomous Database resources in Azure. |
| odbaa-db-family-administrators | NONE |
This group is replicated in OCI during the optional identity federation process. This group is for administrators who need to manage all Oracle Database Service resources in OCI. |
| odbaa-db-family-readers | Oracle.Database Reader |
This group is replicated in OCI during the optional identity federation process. This group is for readers who need to view all Oracle Database resources in OCI. |
| odbaa-network-administrators | NONE |
This group is replicated in OCI during the optional identity federation process. This group is for administrators who need to manage all network resources in OCI. |
| odbaa-costmgmt-administrators | NONE |
This group is replicated in OCI during the optional identity federation process. This group is for administrators who need to manage cost and billing resources in OCI. |
To configure role based access control in the Azure portal for Autonomous Database
-
Sign in to the Azure portal at https://portal.azure.com/.
-
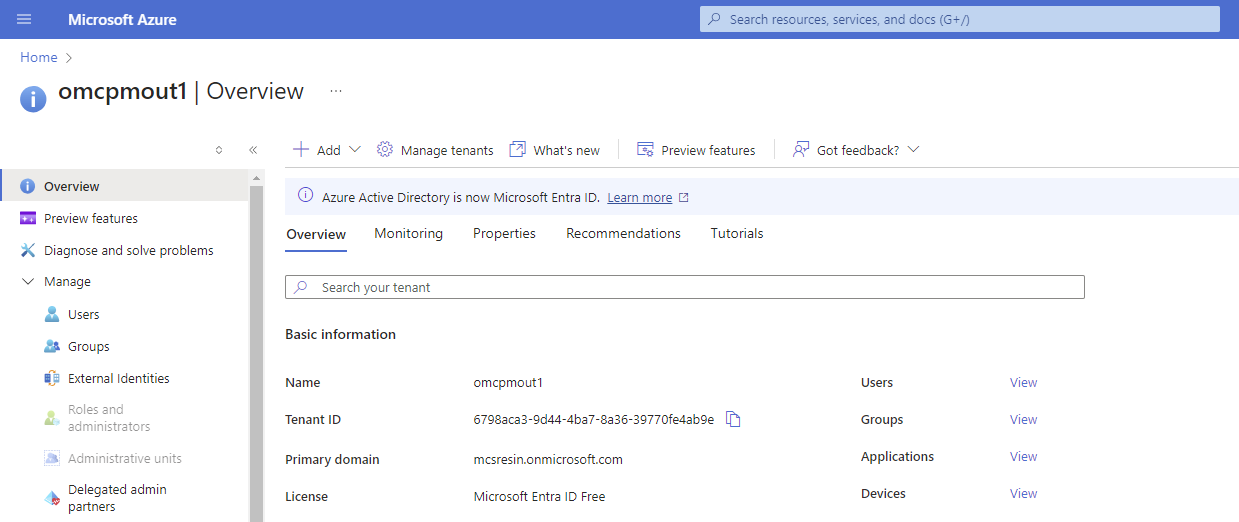
Search for "EntraID" in the Azure search tool, then select Microsoft Entra ID in the search results to navigate to the EntraID Overview page.
-
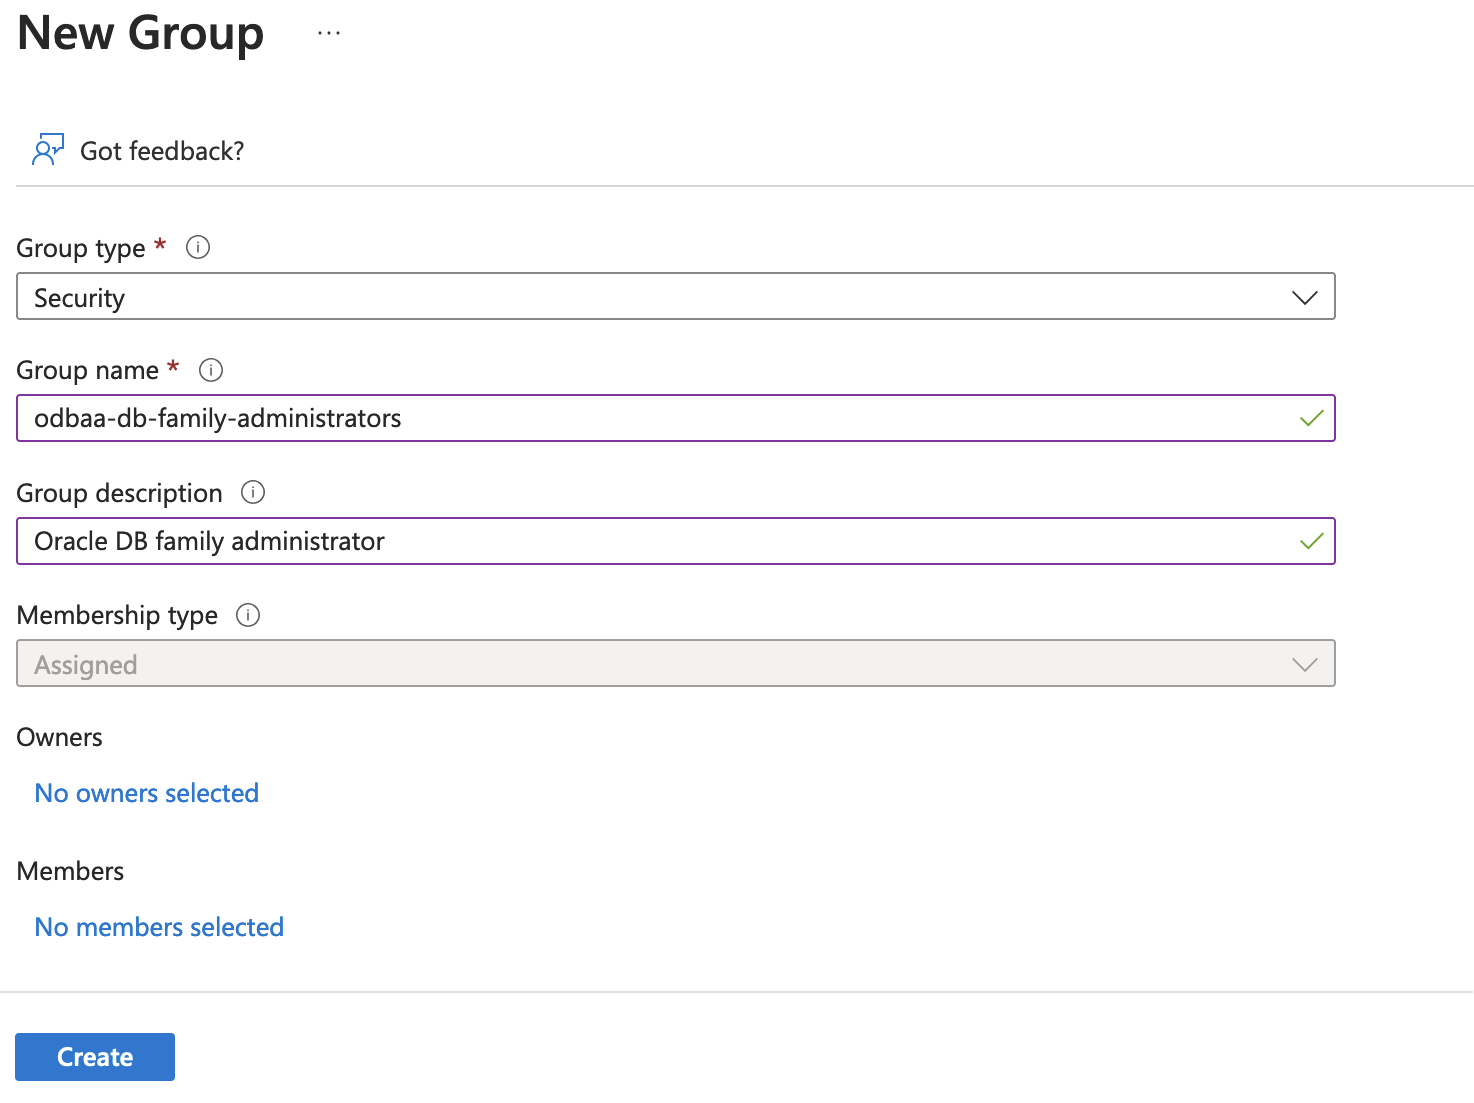
Select Groups to navigate to the groups page. Then select All groups.
- Repeat the previous step to create new groups for all the Azure groups listed in the table in this topic.
-
Navigate to Subscriptions page in the Azure portal, then find your Azure subscription in the page. Click the name of the subscription to view the subscription details. See View all subscriptions in the Azure documentation for more information.
-
On the Access Control (IAM) section of the Azure subscription details page, click +Add and select the Add role assignment option.
-
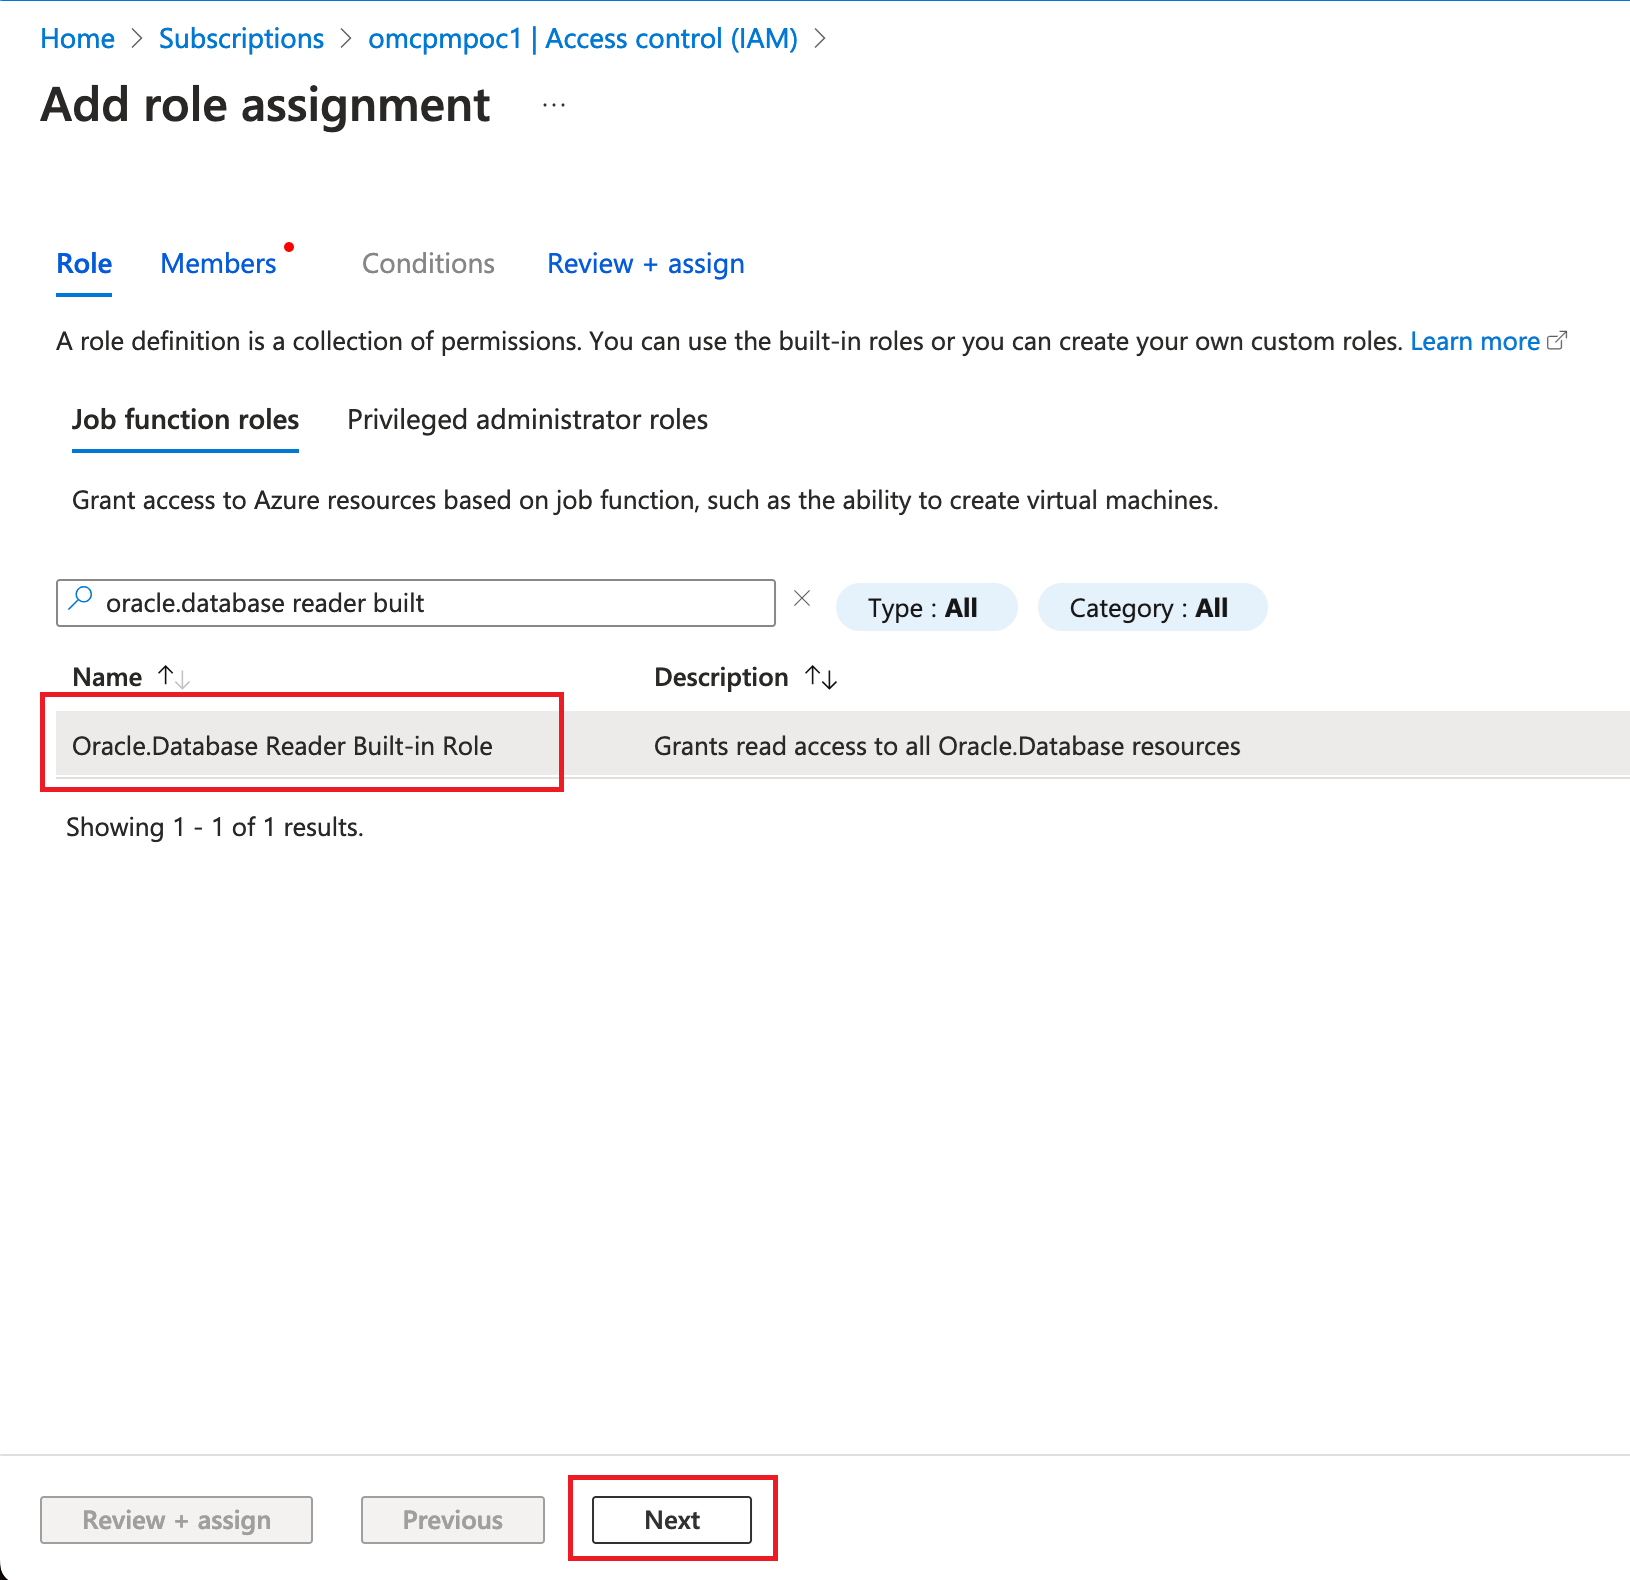
Search for any of the Autonomous Database roles listed in the table in this topic. For example,
Oracle.Database Reader. Select the role, then click Next. -
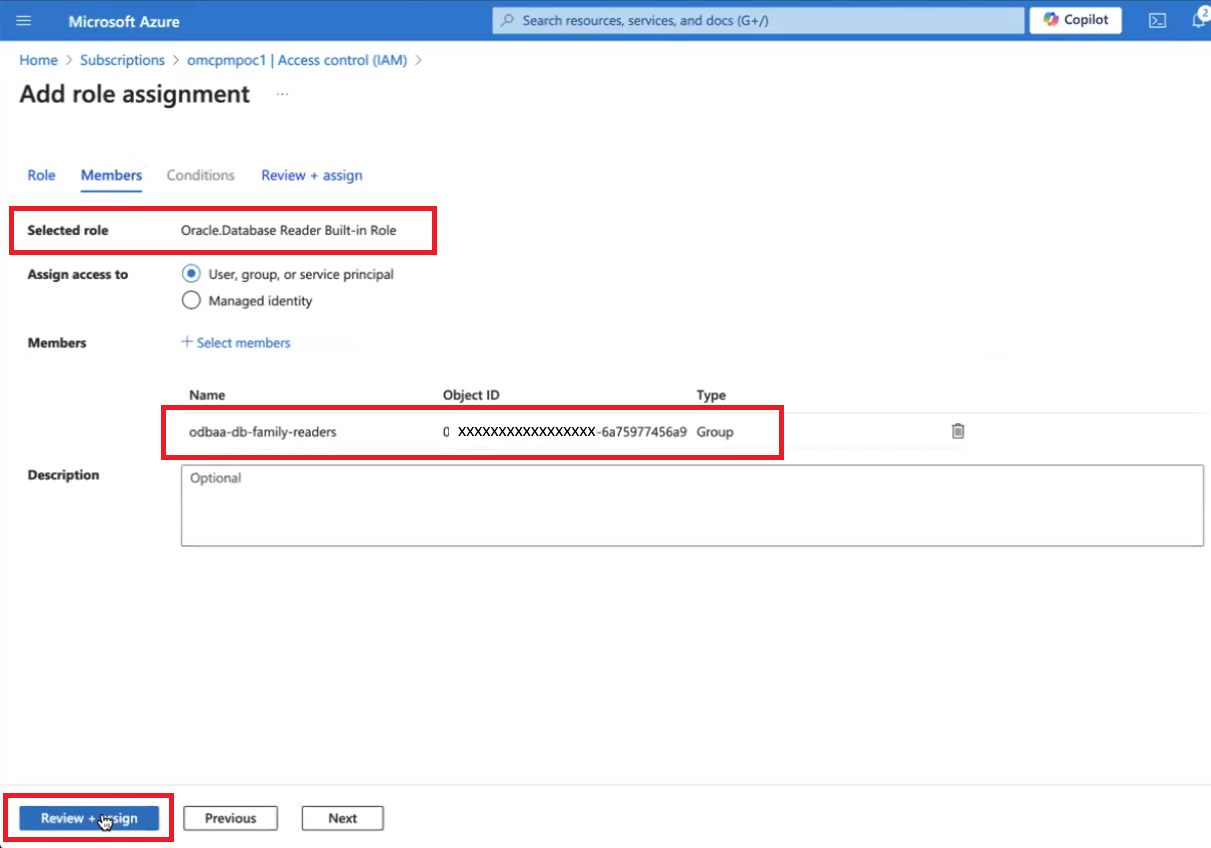
On the Members tab of the Add role assignment work flow, select +Select Members.
-
Search for "odbaa" in the search field. Groups that begin with "odbaa" are displayed. Select a group name to select it. For example: "odbaa-db-family-readers".
-
On the Members tab, select Review + assign.
- Repeat steps 7 to 11 for each Azure Autonomous Database group that have role assignments specified in the table.
Exadata Groups and Roles
| Azure Group name | Azure Role assignment | Purpose |
|---|---|---|
| odbaa-exa-infra-administrators | Oracle.Database Exadata Infrastructure Administrator | This group is for administrators who need to manage all Exadata Database Service resources in Azure. Users with this role have all the permissions granted by "odbaa-vm-cluster-administrators". |
| odbaa-vm-cluster-administrators | Oracle.Database VmCluster Administrator | This group is for administrators who need to manage VM cluster resources in Azure. |
| odbaa-db-family-administrators | NONE |
This group is replicated in OCI during the optional identity federation process. This group is for administrators who need to manage all Oracle Database Service resources in OCI. |
| odbaa-db-family-readers | Oracle.Database Reader |
This group is replicated in OCI during the optional identity federation process. This group is for readers who need to view all Oracle Database resources in OCI. |
| odbaa-exa-cdb-administrators | NONE |
This group is replicated in OCI during the optional identity federation process. This group is for administrators who need to manage all CDB resources in OCI. |
| odbaa-exa-pdb-administrators | NONE |
This group is replicated in OCI during the optional identity federation process. This group is for administrators who need to manage all PDB resources in OCI. |
| odbaa-network-administrators | NONE |
This group is replicated in OCI during the optional identity federation process. This group is for administrators who need to manage all network resources in OCI. |
| odbaa-costmgmt-administrators | NONE |
This group is replicated in OCI during the optional identity federation process. This group is for administrators who need to manage cost and billing resources in OCI. |
To configure role based access control in the Azure portal for Exadata Database
-
Sign in to the Azure portal at https://portal.azure.com/.
-
Search for "EntraID" in the Azure search tool, then select Microsoft Entra ID in the search results to navigate to the EntraID Overview page.
-
Select Groups to navigate to the groups page. Then select All groups.
- Repeat the previous step to create new groups for all the Azure groups listed in the table in this topic.
-
Navigate to Subscriptions page in the Azure portal, then find your Azure subscription in the page. Click the name of the subscription to view the subscription details. See View all subscriptions in the Azure documentation for more information.
-
On the details page for your subscription, click Access Control (IAM), then click +Add and select the Add role assignment option.
-
Search for any of the roles listed in the table of Exadata groups and roles in this topic. For example,
Oracle.Database Reader. Select the role, then click Next. -
On the Members tab of the Add role assignment work flow, click +Select Members.
-
Search for "odbaa" in the search field. Groups that begin with "odbaa" are displayed. Click a group name to select it. For example: "odbaa-db-family-readers".
-
On the Members tab, click Review + assign.
- Repeat steps 12 to 16 for each Azure groups listed in the table of Exadata groups and roles that have role assignments specified in the table.
What's Next?
Oracle Database@Azure is ready for use. You can now do the following:
- Set up identity federation for Oracle Database@Azure (optional). Federation lets users sign in to the OCI tenancy associated with the service using Azure Entra ID credentials. See Task 8: Set Up Identity Federation (Optional) for details.
- If you do not use identity federation, you can add additional users in the OCI Console. See Overview of IAM and Managing Users for more information. Optionally, you can register users with My Oracle Support to allow them to open service requests.
- Review the suggestions at What's Next After Onboarding?


