Flow Mapping
The following topics show the various types of events from which you can map to a flow.
Map an Intent to a Flow
You can map an intent to a flow when you create the flow:
- On the Events page, click + Add Flow.
- In the Create Flow dialog, fill in the required fields, including Intent Name.
If you have already defined a flow and now need to map an intent to it, here's how you map the intent:
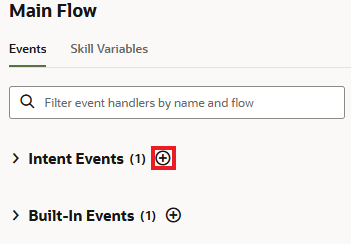
- On the Flows page, in the list of flows, select Main Flow.
- Click
 in the Intent Events section.
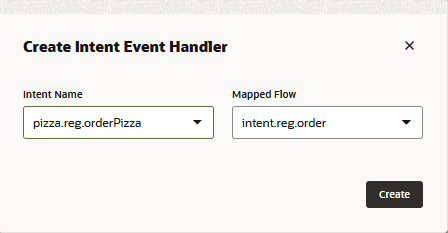
- In the Create Intent Event Handler dialog, select the intent
name and mapped flow, and then click
Create
.
Map a Built-In Event to a Flow
- Select Main Flow.
- Click
 in the Built-In Events section.
- In the Create Built-In Event Handler dialog, select the event type from
the and mapped flow, and click Create.
Map a Transition Event to a Flow
- Select the flow to which you want to map the event.
- Select the Configuration tab.
- Expand the Event Mappings section.
- In the field for the transition that you want to map, select a state.
Invoke One Flow from Another Flow
If you want to call a flow from another flow, you do so by using Invoke Flow and End Flow components. Here's how it works:
- The parent flow calls the child flow from an invoke flow state. It uses this state to pass values to and receive values from the child flow.
- The child flow's end flow state passes its output parameters back to
the parent flow and can also trigger an action that the parent flow executes after
the child flow has ended.
If the child flow branches and has multiple end flow states, each can pass its own action back to the parent flow, and the parent flow can use these actions to determine which branch to follow.
(Action transitions enable you to branch the parent flow based on the results of the child flow. For example, if you have a child flow that is supposed to look up an account, it could pass an action for success and an action for failure.)
- After the child flow has ended, the parent flow resumes.
For example, an Update Account flow in a finance skill would be the parent flow that can only complete the user's update request by calling a child flow, Get Account. The result, or output parameter that the parent flow expects after the child flow executes, is the user account. In this case, the account is the output parameter sent to the invoke flow state by the child flow's end flow state.
- Create the input and output parameters for the child flow.
- In the parent, or calling flow, click the Add State icon at the point where you want to call the child flow and select the Flow Control > Invoke Flow component. Then click Insert.
- Open the property inspector for the invoke flow state that you just added.
- On the General page, enter a name and a description.
- On the Component page, select the child flow from the Flow dropdown.
- If the parent flow needs to pass parameters to the child flow, click Add, then select the input parameter belonging to the child flow and enter a default value. Then click Save. Repeat this step for each input parameter.
- If the parent flow expects a result from the child flow, click Add to select the output parameter belonging to the child flow and then name the variable of the current (parent) flow that gets set to the value of the output parameter.
- Open the Transitions page to set the next state and, if needed, add action transitions such as cancel or error.
- If you have configured action transitions in the parent flow, configure end flow states in the child flow to trigger those actions. You do those on the Component page of each end flow's property inspector.
- If you need to pass a parameter back to the parent flow, click Add and then enter the name that matches the parameter name in the parent flow's invoke flow state. Then enter a parameter output value and click Save.
Invoke Another Skill from a Flow
If you want to call another skill from a flow, you do so by using Invoke Skill and End Flow components. Here's how it works:
- The skill that you are calling must be in the same digital assistant as the skill you are calling from.
- The skill that you are calling must have a flow that's designated as public.
- The calling flow uses an Invoke Skill state to specify a version of a skill and a target flow in that skill. It uses this state to pass values to and receive values from the called skill.
- The target flow's end flow state passes its output parameters back to
the calling flow and can also trigger an action that the calling flow executes after
the target flow has ended.
If the target flow branches and has multiple end flow states, each can pass its own action back to the calling flow, and the calling flow can use these actions to determine which branch to follow.
(Action transitions enable you to branch the calling flow based on the results of the target flow. For example, if you have a target flow that is supposed to look up an account, it could pass an action for success and an action for failure.)
- After the target flow has ended, the calling flow from the calling skill resumes.
For example, an Update Account flow in a finance skill would be the calling flow that can only complete the user's update request by calling a target flow, Get Account. The result, or output parameter that the calling flow expects after the target flow executes, is the user account. In this case, the account is the output parameter sent to the invoke skill state by the target flow's end flow state.
- Create the input and output parameters for the target flow.
- In the target flow, select the Configuration
tab, expand the General section, and turn the
Public switch on.

- In the calling flow, click the Add State icon at the point where you want to call the target flow and select the Flow Control > Invoke Skill component. Then click Insert.
- Open the property inspector for the invoke skill state that you just added.
- On the General page, enter a name and a description.
- On the Component page, select skill from the Skill dropdown.
- Select a version from the Skill Version
dropdown.
Note
This value only applies if the referenced skill is a standalone skill. If the target skill is in the same digital assistant as the calling skill, at runtime the version of that skill that is in the digital assistant is used and the value of this field is ignored. - From the Flow Name dropdown, select one of the public flows that belong to the selected skill.
- If the calling flow needs to pass parameters to the target flow, click Add, then select the input parameter belonging to the target flow and enter a default value. Then click Save. Repeat this step for each input parameter.
- If the calling flow expects a result from the target flow, click
Add to select the output parameter belonging to the
target flow and then name the variable of the calling flow that gets set to the
value of the output parameter.
Note
If the target flow isn't yet available, you can specify that the flow use mock data for the output parameters so that you can continue developing and testing the flow while waiting for the target flow to become available. To do so, set the Use Mock property toTrueand enter output parameters and values in the Mock Output Parameters field. Enter each parameter on a separate line in the formParamName: ParamValue - Open the Transitions page to set the next state and, if needed, add action transitions such as cancel or error.
- If you have configured action transitions in the calling flow, configure end flow states in the target flow to trigger those actions. You do those on the Component page of each end flow's property inspector.
- If you need to pass a parameter back to the calling flow, click Add and then enter the name that matches the parameter name in the calling flow's invoke skill state. Then enter a parameter output value and click Save.

