Protecting Data on NVMe Devices
Some compute instance shapes in Oracle Cloud Infrastructure include locally attached NVMe devices. These devices provide extremely low latency, high performance block storage that is ideal for big data, OLTP, and any other workload that can benefit from high-performance block storage.
NVMe devices are not protected in any way; they are individual devices locally installed on your instance. Oracle Cloud Infrastructure does not take images, back up, support encryption-at-rest, or use RAID or any other methods to protect the data on NVMe devices. It is your responsibility to protect and manage the durability of the data on these devices.
Oracle Cloud Infrastructure offers high-performance remote block (iSCSI) LUNs that are redundant and can be backed up using an API call. See Overview of Block Volume for more information.
For information about which shapes support local NVMe storage, see Compute Shapes.
Finding the NVMe devices on your instance
You can identify the NVMe devices by using the lsblk command. The response returns a list. NVMe devices begin with "nvme", as shown in the following example for a BM.DenseIO1.36 instance:
[opc@somehost ~]$ lsblk
NAME    MAJ:MIN RM  SIZE RO TYPE MOUNTPOINT
sda       8:0    0 46.6G  0 disk
├─sda1    8:1    0  512M  0 part /boot/efi
├─sda2    8:2    0    8G  0 part [SWAP]
└─sda3    8:3    0   38G  0 part /
nvme0n1 259:6    0  2.9T  0 disk
nvme1n1 259:8    0  2.9T  0 disk
nvme2n1 259:0    0  2.9T  0 disk
nvme3n1 259:1    0  2.9T  0 disk
nvme4n1 259:7    0  2.9T  0 disk
nvme5n1 259:4    0  2.9T  0 disk
nvme6n1 259:5    0  2.9T  0 disk
nvme7n1 259:2    0  2.9T  0 disk
nvme8n1 259:3    0  2.9T  0 disk
[opc@somehost ~]$
Failure Modes and How to Protect Against Them
There are three primary failure modes you should plan for:
Protecting Against the Failure of an NVMe Device
A protected RAID array is the most recommended way to protect against an NVMe device failure. There are three RAID levels that can be used for the majority of workloads:
-
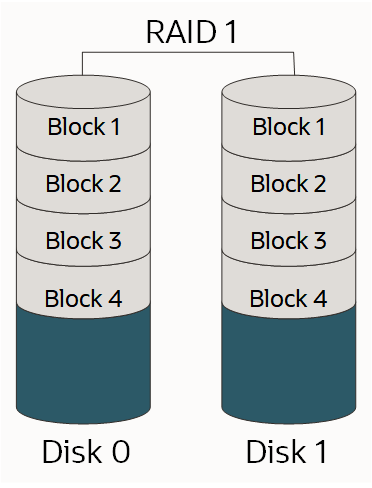
RAID 1: An exact copy (or mirror) of a set of data on two or more disks; a classic RAID 1 mirrored pair contains two disks, as shown:
-
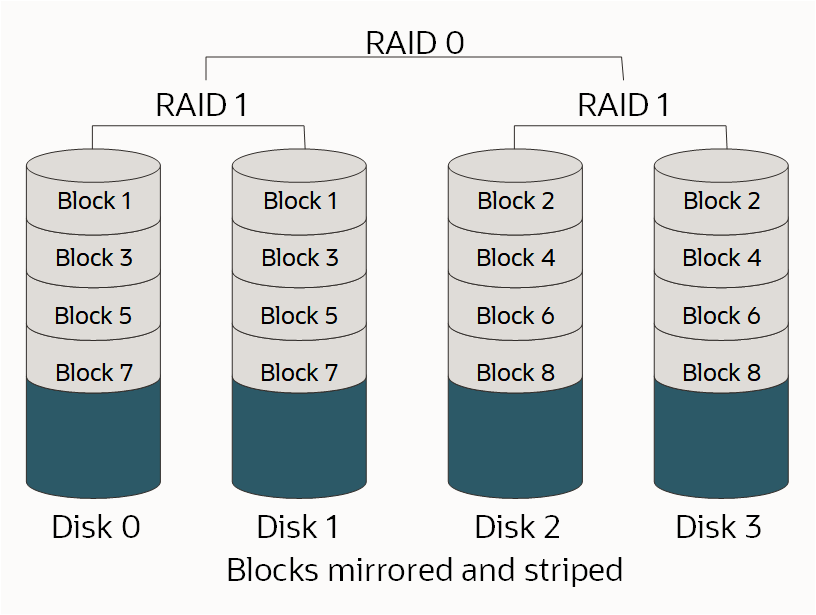
RAID 10: Stripes data across multiple mirrored pairs. As long as one disk in each mirrored pair is functional, data can be retrieved, as shown:
-
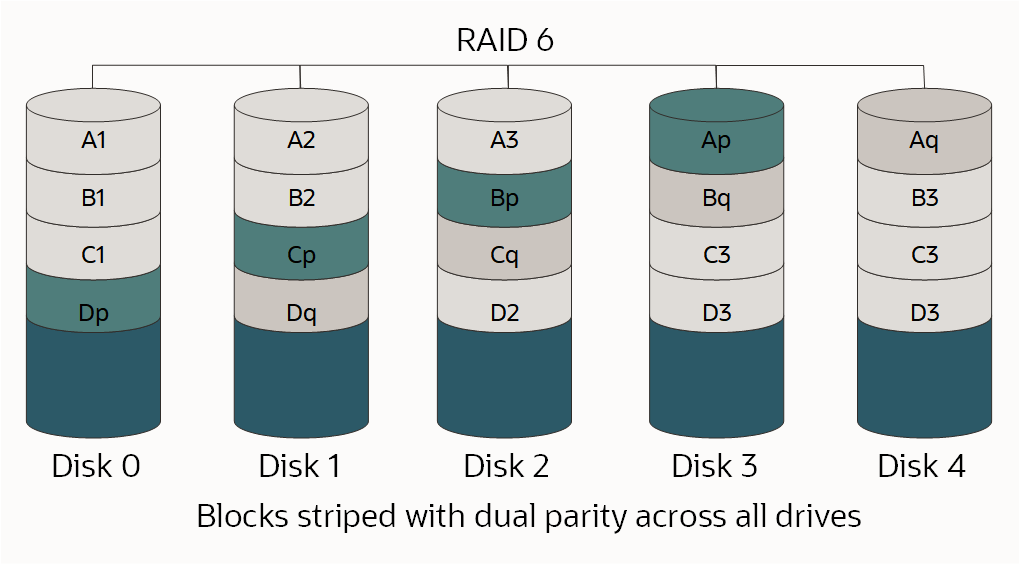
RAID 6: Block-level striping with two parity blocks distributed across all member disks, as shown.
For more information about RAID and RAID levels, see RAID.
Because the appropriate RAID level is a function of the number of available drives, the number of individual LUNs needed, the amount of space needed, and the performance requirements, there isn't one correct choice. You must understand your workload and design accordingly.
If you're partitioning or formatting your disk as part of this process and the drive is larger than 2 TB, you should create a GUID Partition Table (GPT). If you want to create a GPT, use parted instead of the fdisk command. For more information, see About Disk Partitions in the Oracle Linux Administrator's Guide.
Options for Using a BM.DenseIO1.36 Shape
There are several options for BM.DenseIO1.36 instances with nine NVMe devices.
For all options below, you can optionally increase the default RAID resync speed limit value. Increasing this value to more closely match the fast storage speed on the bare metal instances can decrease the amount of time required to set up RAID.
Use the following command to increase the speed limit value:
$ sysctl -w dev.raid.speed_limit_max=10000000Option 1: Create a single RAID 6 device across all nine devices
This array is redundant, performs well, will survive the failure of any two devices, and will be exposed as a single LUN with about 23.8TB of usable space.
Use the following commands to create a single RAID 6 device across all nine devices:
$ sudo yum install mdadm -y$ sudo mdadm --create /dev/md0 --raid-devices=9 --level=6 /dev/nvme0n1 /dev/nvme1n1 /dev/nvme2n1 /dev/nvme3n1 /dev/nvme4n1 /dev/nvme5n1 /dev/nvme6n1 /dev/nvme7n1 /dev/nvme8n1$ sudo mdadm --detail --scan | sudo tee -a /etc/mdadm.conf >> /dev/nullOption 2: Create a four device RAID 10 and a five device RAID 6 array
These arrays would be exposed as two different LUNs to your applications. This is a recommended choice when you need to isolate one type of I/O from another, such as log and data files. In this example, your RAID 10 array would have about 6.4TB of usable space and the RAID 6 array would have about 9.6TB of usable space.
Use the following commands to create a four-device RAID 10 and a five-device RAID 6 array:
$ sudo yum install mdadm -y$ sudo mdadm --create /dev/md0 --raid-devices=4 --level=10 /dev/nvme5n1 /dev/nvme6n1 /dev/nvme7n1 /dev/nvme8n1$ sudo mdadm --create /dev/md1 --raid-devices=5 --level=6 /dev/nvme0n1 /dev/nvme1n1 /dev/nvme2n1 /dev/nvme3n1 /dev/nvme4n1$ sudo mdadm --detail --scan | sudo tee -a /etc/mdadm.conf >> /dev/nullOption 3: Create an eight-device RAID 10 array
If you need the best possible performance and can sacrifice some of your available space, then an eight-device RAID 10 array is an option. Because RAID 10 requires an even number of devices, the ninth device is left out of the array and serves as a hot spare in case another device fails. This creates a single LUN with about 12.8 TB of usable space.
Use the following commands to create an eight-device RAID 10 array:
$ sudo yum install mdadm -y$ sudo mdadm --create /dev/md0 --raid-devices=8 --level=10 /dev/nvme0n1 /dev/nvme1n1 /dev/nvme2n1 /dev/nvme3n1 /dev/nvme4n1 /dev/nvme5n1 /dev/nvme6n1 /dev/nvme7n1The following command adds /dev/nvme8n as a hot spare for the /dev/md0 array:
$ sudo mdadm /dev/md0 --add /dev/nvme8n1 $ sudo mdadm --detail --scan | sudo tee -a /etc/mdadm.conf >> /dev/nullOption 4: Create two four-device RAID 10 arrays
For the best possible performance and I/O isolation across LUNs, create two four-device RAID 10 arrays. Because RAID 10 requires an even number of devices, the ninth device is left out of the arrays and serves as a global hot spare in case another device in either array fails. This creates two LUNS, each with about 6.4 TB of usable space.
Use the following commands to create two four-device RAID 10 arrays with a global hot spare:
$ sudo yum install mdadm -y$ sudo mdadm --create /dev/md0 --raid-devices=4 --level=10 /dev/nvme4n1 /dev/nvme5n1 /dev/nvme6n1 /dev/nvme7n1$ sudo mdadm --create /dev/md1 --raid-devices=4 --level=10 /dev/nvme0n1 /dev/nvme1n1 /dev/nvme2n1 /dev/nvme3n1Creating a global hot spare requires the following two steps:
-
Add the spare to either array (it does not matter which one) by running these commands:
$ sudo mdadm /dev/md0 --add /dev/nvme8n1$ sudo mdadm --detail --scan | sudo tee -a /etc/mdadm.conf >> /dev/null -
Edit
/etc/mdadmto put both arrays in the same spare-group. Addspare-group=globalto the end of the line that starts withARRAY, as follows:$ sudo vi /etc/mdadm.confARRAY /dev/md0 metadata=1.2 spares=1 name=mdadm.localdomain:0 UUID=43f93ce6:4a19d07b:51762f1b:250e2327 spare-group=globalARRAY /dev/md1 metadata=1.2 name=mdadm.localdomain:1 UUID=7521e51a:83999f00:99459a19:0c836693 spare-group=global
Monitoring Your Array
It's important for you to be notified if a device in one of your arrays fails. Mdadm has built-in tools that can be utilized for monitoring, and there are two options you can use:
- Set the
MAILADDRoption in/etc/mdadm.confand then run themdadmmonitor as a daemon - Run an external script when
mdadmdetects a failure
Set the MAILADDR option in /etc/mdadm.conf and run the mdadm monitor as a daemon
The simplest method is to set the MAILADDR option in /etc/mdadm.conf, and then run the mdadm monitor as a daemon, as follows:
-
The
DEVICE partitionsline is required forMAILADDRto work; if it is missing, you must add it, as follows:$ sudo vi /etc/mdadm.confDEVICE partitionsARRAY /dev/md0 level=raid1 UUID=1b70e34a:2930b5a6:016we78d:eese14532MAILADDR <my.name@example.com> -
Run the monitor using the following command:
$ sudo nohup mdadm –-monitor –-scan –-daemonize & -
To verify that the monitor runs at startup, run the following commands:
$ sudo chmod +x /etc/rc.d/rc.local$ sudo vi /etc/rc.localAdd the following line to the end of /etc/rc.local:
nohup mdadm –-monitor –-scan –-daemonize & -
To verify that the email and monitor are both working run the following command:
$ sudo mdadm --monitor --scan --test -1Note that these emails will likely be marked as spam. The
PROGRAMoption, described later in this topic, allows for more sophisticated alerting and messaging.
Run an external script when a failure is detected
A more advanced option is to create an external script that would run if the mdadm monitor detects a failure. You would integrate this type of script with your existing monitoring solution. The following is an example of this type of script:
$ sudo vi /etc/mdadm.events

#!/bin/bash
event=$1
device=$2
if [ $event == "Fail" ]
then
  <"do something">
else
 if [ $event == "FailSpare" ]
 then
  <"do something else">
 else
  if [ $event == "DegradedArray" ]
  then
   <"do something else else">
  else
   if [ $event == "TestMessage" ]
    then
    <"do something else else else">
   fi
  fi
 fi
fi

$ sudo chmod +x /etc/mdadm.events
Next, add the PROGRAM option to /etc/mdadm.conf, as shown in the following example:
-
The
DEVICE partitionsline is required forMAILADDRto work; if it is missing, you must add it, as follows:$ sudo vi /etc/mdadm.confDEVICE partitionsARRAY /dev/md0 level=raid1 UUID=1b70e34a:2930b5a6:016we78d:eese14532MAILADDR <my.name@example.com>PROGRAM /etc/mdadm.events -
Run the monitor using the following command:
$ sudo nohup mdadm –-monitor –-scan –-daemonize & -
To verify that the monitor runs at startup, run the following commands:
$ sudo chmod +x /etc/rc.d/rc.local$ sudo vi /etc/rc.localAdd the following line to the end of /etc/rc.local:
nohup mdadm –-monitor –-scan –-daemonize & -
To verify that the email and monitor are both working run the following command:
$ sudo mdadm --monitor --scan --test -1Note that these emails will likely be marked as spam. The
PROGRAMoption, described later in this topic, allows for more sophisticated alerting and messaging.
Simulate the failure of a device
You can use mdadm to manually cause a failure of a device to see whether your RAID array can survive the failure, as well as test the alerts you have set up.
-
Mark a device in the array as failed by running the following command:
$ sudo mdadm /dev/md0 --fail /dev/nvme0n1 -
Recover the device or your array might not be protected. Use the following command:
$ sudo mdadm /dev/md0 --add /dev/nvme0n1Your array will automatically rebuild in order to use the "new" device. Performance will be decreased during this process.
-
You can monitor the rebuild status by running the following command:
$ sudo mdadm --detail /dev/md0
What To Do When an NVMe Device Fails
Compute resources in the cloud are designed to be temporary and fungible. If an NVMe device fails while the instance is in service, you should start another instance with the same amount of storage or more, and then copy the data onto the new instance, replacing the old instance. There are multiple toolsets for copying large amounts of data, with rsync being the most popular. Since the connectivity between instances is a full 10 Gb/sec, copying data should be quick. Remember that with a failed device, your array may no longer be protected, so you should copy the data off of the impacted instance as quickly as possible.
Using the Linux Logical Volume Manager
The Linux Logical Volume Manager (LVM) provides a rich set of features for managing volumes. If you need these features, we strongly recommend that you use mdadm as described in preceding sections of this topic to create the RAID arrays, and then use LVM's pvcreate, vgcreate, and lvcreate commands to create volumes on the mdadm LUNs. You should not use LVM directly against your NVMe devices.
Protecting Against the Loss of the Instance or Availability Domain
Once your data is protected against the loss of a NVMe device, you need to protect it against the loss of an instance or the loss of the availability domain. This type of protection is typically done by replicating your data to another availability domain or backing up your data to another location. The method you choose depends on your objectives. For details, see the disaster recovery concepts of Recovery Time Objective (RTO) and Recovery Point Objective (RPO).
Replication
Replicating your data from one instance in one availability domain to another has the lowest RTO and RPO at a significantly higher cost than backups; for every instance in one availability domain, you must have another instance in a different availability domain.
For Oracle database workloads, you should use the built-in Oracle Data Guard functionality to replicate your databases. Oracle Cloud Infrastructure availability domains are each close enough to each other to support high performance, synchronous replication. Asynchronous replication is also an option.
For general-purpose block replication, DRBD is the recommended option. You can configure DRBD to replicate, synchronously or asynchronously, every write in one availability domain to another availability domain.
Backups
Traditional backups are another way to protect data. All commercial backup products are fully supported on Oracle Cloud Infrastructure. If you use backups, the RTO and RPO are significantly higher than using replication because you must recreate the compute resources that failed and then restore the most recent backup. Costs are significantly lower because you don't need to maintain a second instance. Do not store your backups in the same availability domain as their original instance.
Protecting Against Data Corruption or Loss from Application or User Error
The two recommended ways of protecting against data corruption or loss from application or user error are regularly taking snapshots or creating backups.
Snapshots
The two easiest ways to maintain snapshots are to either use a file system that supports snapshots, such as ZFS, or use LVM to create and manage the snapshots. Because of the way LVM has implemented copy-on-write (COW), performance may significantly decrease when a snapshot is taken using LVM.
Backups
All commercial backup products are fully supported on Oracle Cloud Infrastructure. Make sure that your backups are stored in a different availability domain from the original instance.


