Access to Other Clouds with Libreswan
Libreswan is an open source IPSec implementation that is based on FreeS/WAN and Openswan. Most Linux distributions include Libreswan or make it easy to install. You can install it on hosts in either your on-premises network or a cloud provider network. This topic shows how to connect your Oracle Cloud Infrastructure Virtual Cloud Network (VCN) with another cloud provider by using Site-to-Site VPN with a Libreswan VM as the customer-premises equipment (CPE).
In the example shown here, the other cloud provider is Amazon Web Services (AWS). Site-to-Site VPN provides a secure and encrypted site-to-site IPSec connection between the Oracle and Amazon environments. It enables resources in the two clouds to communicate with each other using their private IP addresses as if they are in the same network segment.
A Libreswan CPE guide is also available for all other use cases.
Virtual tunnel interface (VTI) support for this route-based configuration requires minimum Libreswan version 3.18 and a recent Linux 3.x or 4.x kernel. This configuration was validated using Libreswan version 3.29.
Architecture
Supported IPSec Parameters
For a vendor-neutral list of supported IPSec parameters for all regions, see Supported IPSec Parameters.
The Oracle BGP ASN for the commercial cloud realm is 31898. If you're configuring Site-to-Site VPN for the US Government Cloud, see Required Site-to-Site VPN Parameters for Government Cloud and also Oracle's BGP ASN. For the United Kingdom Government Cloud, see Regions.
Configuration
The configuration instructions in this section are provided by Oracle Cloud Infrastructure for Libreswan. If you need support or further assistance, consult the Libreswan documentation.
Libreswan supports both route-based and policy-based tunnels. The tunnel types can coexist without interfering with each other. The Oracle VPN headends use route-based tunnels. Oracle recommends that you configure Libreswan with the Virtual Tunnel Interface (VTI) configuration syntax.
Refer to Supported IPSec Parameters for more details about the specific parameters used in this document.
Default Libreswan Configuration Files
The default Libreswan installation creates the following files:
-
etc/ipsec.conf: The root of the Libreswan configuration. -
/etc/ipsec.secrets: The root of the location where Libreswan looks for secrets (the tunnel pre-shared keys). -
/etc/ipsec.d/: A directory for storing the.confand.secretsfiles for your Oracle Cloud Infrastructure tunnels (for example:oci-ipsec.confandoci-ipsec.secrets). Libreswan encourages you to create these files in this folder.
The default etc/ipsec.conf file includes this line:
include /etc/ipsec.d/*.confThe default etc/ipsec.secrets file includes this line:
include /etc/ipsec.d/*.secretsThe preceding lines automatically merge all the.conf and .secrets files in the /etc/ipsec.d directory into the main configuration and secrets files that Libreswan uses.
About Using IKEv2
Oracle supports Internet Key Exchange version 1 (IKEv1) and version 2 (IKEv2). If you configure the IPSec connection in the Console to use IKEv2, you must configure your CPE to use only IKEv2 and related IKEv2 encryption parameters that your CPE supports. For a list of parameters that Oracle supports for IKEv1 or IKEv2, see Supported IPSec Parameters.
You specify the IKE version when setting up the IPSec configuration file in task 4 in the next section. In that example file, there's a comment showing how to configure IKEv1 versus IKEv2.
Configuration Process
- Using the AWS Console or APIs, create a Libreswan VM by using its provisioning process. Use Oracle Linux, CentOS, or Red Hat as the main operating system.
-
After the new instance starts, connect to it with SSH and install the Libreswan package:
sudo yum -y install libreswan -
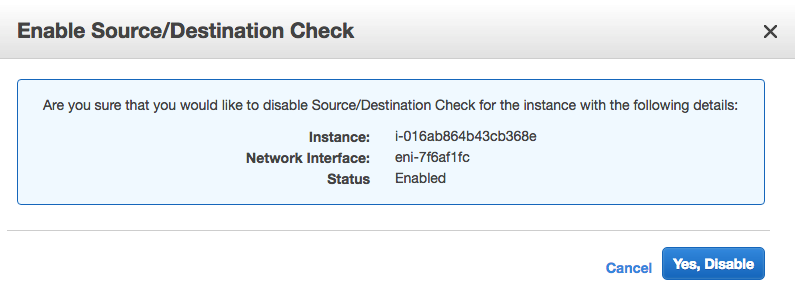
In the AWS Console, disable the source and destination checks on the Libreswan VM instance by right-clicking the instance, clicking Networking, and then clicking Change Source/Dest. Check. When prompted, click Yes, Disable.
-
On the Libreswan VM, configure IP_forward to allow AWS clients to send and receive traffic through the Libreswan VM. In the
/etc/sysctl.conffile, set the following values and apply the updates withsudo sysctl -p.net.ipv4.ip_forward=1 net.ipv4.conf.all.accept_redirects = 0 net.ipv4.conf.all.send_redirects = 0 net.ipv4.conf.default.send_redirects = 0 net.ipv4.conf.eth0.send_redirects = 0 net.ipv4.conf.default.accept_redirects = 0 net.ipv4.conf.eth0.accept_redirects = 0 -
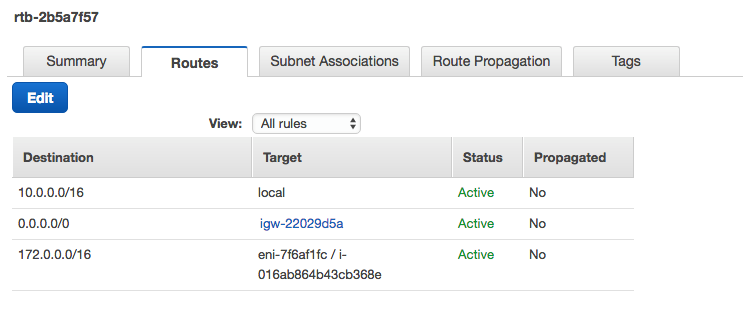
In the AWS Console, edit your AWS route table. Add a rule with the VCN CIDR (172.0.0.0/16) as the destination and the AWS Libreswan instance ID (i-016ab864b43cb368e in this example) as the target.
-
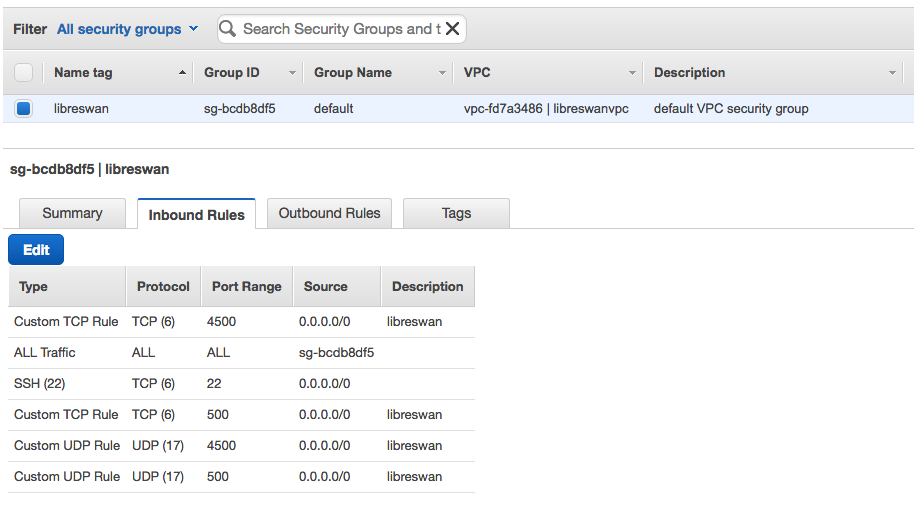
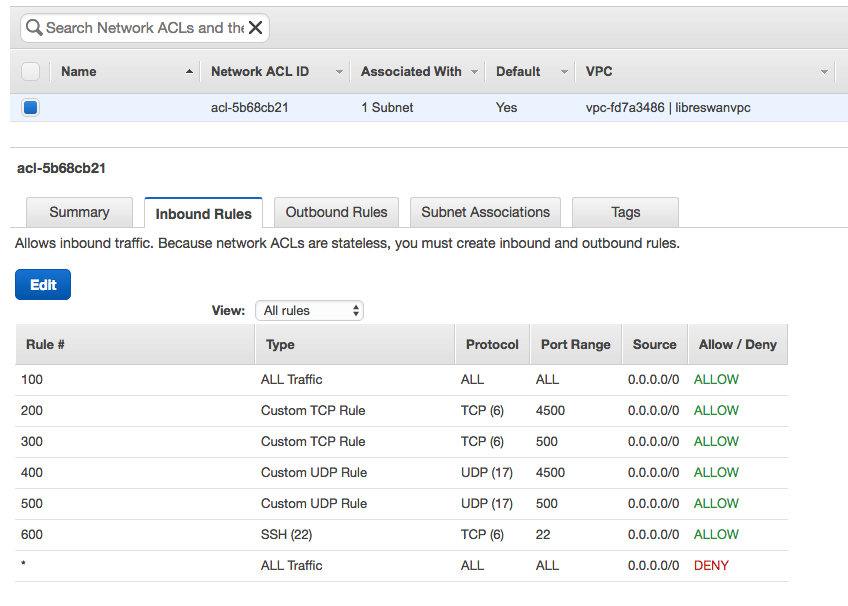
In the AWS Console, enable inbound TCP and UDP traffic on ports 4500 and 500 to allow an Oracle Cloud Infrastructure Site-to-Site VPN IPSec connection with the AWS Libreswan VM. This task includes editing both the AWS security groups and network ACLs. You can set the source value can be the Oracle public IP (the Oracle VPN headend IPSec tunnel endpoint) instead of 0.0.0.0/0.
For security groups:
For network ACLs:
-
In the Oracle Console, create a customer-premises equipment (CPE) object that points to the Libreswan AWS instance public IP address (34.200.255.174). This is easily done using the CPE Configuration Helper.
-
If you don't already have a DRG attached to your VCN: in the Oracle Console, create a DRG and then attach it to the VCN (172.0.0.0/16).
-
In the Oracle Console, create an IPSec connection and point it to the AWS VPC CIDR (10.0.0.0/16). In other words, when you create the IPSec connection, set its static route to the AWS VPC CIDR.
For each configured IPSec connection, Oracle creates two tunnels and assigns these items to each one:
- Oracle VPN headend IPSec tunnel endpoint
- Oracle VPN tunnel shared secret
You can view the IPSec tunnel status and Oracle VPN headend IP by clicking the for the IPSec connection, and then clicking View Details. Initially each tunnel is in the DOWN state (offline) because you still have some additional configuration to do later on the AWS Libreswan VM.
To view the shared secret, click the Actions menu (three dots) for an individual tunnel, and then click View Details. Next to Shared Secret, click Show.
-
In the Oracle Console, edit the VCN's security rules to enable ingress TCP and UDP traffic on ports 4500 and 500 like you did for the AWS security groups and network ACLs. You can use the AWS Libreswan VM public IP address instead of 0.0.0.0/0 if it's a persistent public IP. Also open all protocols and ports for ingress traffic from the AWS VPC CIDR (10.0.0.0/16). Remember: Security lists are associated with a subnet, so edit the security list associated with each subnet that needs to communicate with the AWS VPC. Or, if you're using VCN network security groups, edit the rules in the relevant NSGs.
-
In the Oracle Console, edit the VCN's route tables to add a rule that has the AWS VPC CIDR (10.0.0.0/16) as the destination CIDR block and the DRG you created earlier as the target. Remember: Route tables are associated with a subnet, so edit the route table associated with each subnet that needs to communicate with the AWS VPC.
The Libreswan configuration uses the following variables. Determine the values before proceeding with the configuration.
-
${cpeLocalIP}: The IP address of your Libreswan device. -
${cpePublicIpAddress}: The public IP address for Libreswan. This is the IP address of your outside interface. Depending on your network topology, the value might be different from${cpeLocalIP}. -
${oracleHeadend1}: For the first tunnel, the Oracle public IP endpoint obtained from the Oracle Console. -
${oracleHeadend2}: For the second tunnel, the Oracle public IP endpoint obtained from the Oracle Console. -
${vti1}: The name of the first VTI used. For example, vti1. -
${vti2}: The name of the second VTI used. For example, vti2. -
${sharedSecret1}: The pre-shared key for the first tunnel. You can use the default Oracle-provided pre-shared key, or provide your own when you set up the IPSec connection in the Oracle Console. -
${sharedSecret2}: The pre-shared key for the second tunnel. You can use the default Oracle-provided pre-shared key, or provide your own when you set up the IPSec connection in the Oracle Console. -
${vcnCidrNetwork}: The VCN IP range.
Libreswan configuration uses the concept of left and right to define the configuration parameters for your local CPE device and the remote gateway. Either side of the connection (the conn in the Libreswan configuration) can be left or right, but the configuration for that connection must be consistent. In this example:
- Left: Your local Libreswan CPE
- Right: The Oracle VPN headend
Use the following template for your /etc/ipsec.d/oci-ipsec.conf file. The file defines the two tunnels that Oracle creates when you set up the IPSec connection.
If your CPE is behind a 1–1 NAT device, uncomment the
leftid parameter and set it equal to the ${cpePublicIpAddress}.conn oracle-tunnel-1
left=${cpeLocalIP}
# leftid=${cpePublicIpAddress} # See preceding note about 1-1 NAT device
right=${oracleHeadend1}
authby=secret
leftsubnet=0.0.0.0/0
rightsubnet=0.0.0.0/0
auto=start
mark=5/0xffffffff # Needs to be unique across all tunnels
vti-interface=${vti1}
vti-routing=no
ikev2=no # To use IKEv2, change to ikev2=insist
ike=aes_cbc256-sha2_384;modp1536
phase2alg=aes_gcm256;modp1536
encapsulation=yes
ikelifetime=28800s
salifetime=3600s
conn oracle-tunnel-2
left=${cpeLocalIP}
# leftid=${cpePublicIpAddress} # See preceding note about 1-1 NAT device
right=${oracleHeadend2}
authby=secret
leftsubnet=0.0.0.0/0
rightsubnet=0.0.0.0/0
auto=start
mark=6/0xffffffff # Needs to be unique across all tunnels
vti-interface=${vti2}
vti-routing=no
ikev2=no # To use IKEv2, change to ikev2=insist
ike=aes_cbc256-sha2_384;modp1536
phase2alg=aes_gcm256;modp1536
encapsulation=yes
ikelifetime=28800s
salifetime=3600sUse the following template for your /etc/ipsec.d/oci-ipsec.secrets file. It contains two lines per IPSec connection (one line per tunnel).
${cpePublicIpAddress} ${ipAddress1}: PSK "${sharedSecret1}"
${cpePublicIpAddress} ${ipAddress2}: PSK "${sharedSecret2}"After setting up your configuration and secrets files, you must restart the Libreswan service with the following command.
Restarting the Libreswan service may impact existing tunnels.
service ipsec restartUse the following ip command to create static routes that send traffic to your VCN through the IPSec tunnels. If you're logged in with an unprivileged user account, you might need to use sudo before the command.
Static routes created with the
ip route command do not persist through a reboot. To determine how to make your routes persist, refer to the documentation of your Linux distribution of choice.ip route add ${VcnCidrBlock} nexthop dev ${vti1} nexthop dev ${vti2}
ip route showVerification
A Monitoring service is also available from Oracle Cloud Infrastructure to actively and passively monitor cloud resources. For information about monitoring a Site-to-Site VPN, see Site-to-Site VPN Metrics.
If you have issues, see Site-to-Site VPN Troubleshooting.
Verifying the Libreswan Status
Verify the current state of your Libreswan tunnels by using the following command:
ipsec statusThe tunnel is established if you see a line that includes the following:
STATE_MAIN_I4: ISAKMP SA establishedIf you're using IKEv2, you see the following:
STATE_V2_IPSEC_I (IPsec SA established)In the future, if you need to open a support ticket with Oracle about your Libreswan tunnel, include the output of the preceding ipsec status command.
Checking the Tunnel Interface Status
Check if the virtual tunnel interfaces are up or down by using the
ifconfig command or the ip link show command.
You can also use applications such as tcpdump with the interfaces.
Here's an example of the ifconfig output with a working Libreswan implementation that shows the available VTIs.
ifconfig
<output trimmed>

vti01: flags=209<UP,POINTOPOINT,RUNNING,NOARP> mtu 8980
     inet6 2001:db8::1 prefixlen 64 scopeid 0x20<link>
     tunnel txqueuelen 1000 (IPIP Tunnel)
     RX packets 0 bytes 0 (0.0 B)
     RX errors 0 dropped 0 overruns 0 frame 0
     TX packets 0 bytes 0 (0.0 B)
     TX errors 10 dropped 0 overruns 0 carrier 10 collisions 0

vti02: flags=209<UP,POINTOPOINT,RUNNING,NOARP> mtu 8980
     inet6 2001:db8::2 prefixlen 64 scopeid 0x20<link>
     tunnel txqueuelen 1000 (IPIP Tunnel)
     RX packets 0 bytes 0 (0.0 B)
     RX errors 0 dropped 0 overruns 0 frame 0
     TX packets 0 bytes 0 (0.0 B)
     TX errors 40 dropped 0 overruns 0 carrier 40 collisions 0
Here's an example of the ip link show output:
ip link show
<output trimmed>

9: vti01@NONE: <POINTOPOINT,NOARP,UP,LOWER_UP> mtu 8980 qdisc noqueue
state UNKNOWN mode DEFAULT group default qlen 1000
   link/ipip 10.1.2.3 peer 192.168.0.51

10: vti02@NONE: <POINTOPOINT,NOARP,UP,LOWER_UP> mtu 8980 qdisc noqueue
state UNKNOWN mode DEFAULT group default qlen 1000
   link/ipip 10.1.2.3 peer 192.168.0.49
Also, in the Oracle Console, each IPSec tunnel should now be in the UP state.


