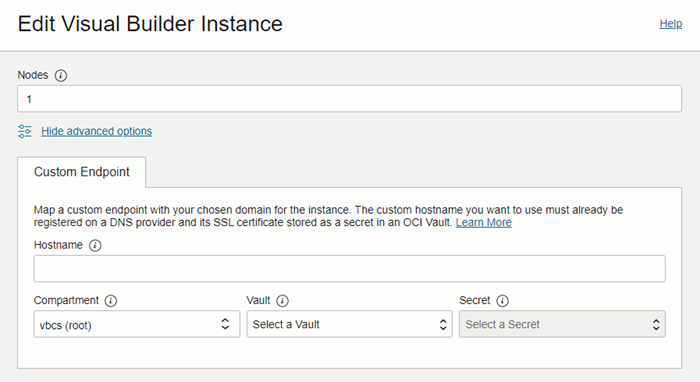
Create and Configure a Custom Endpoint for Your Visual Builder Instance

You can map a custom endpoint to a Visual Builder instance and use it to access the instance instead of the original URL generated in the OCI Console.

You can create a custom hostname with your chosen domain (for example, mycustom.example.org) for your Visual Builder instance. Associating a custom endpoint with your Visual Builder instance doesn't affect the original instance URL. You'll be able to access your instance using the custom endpoint URL as well as the original instance URL.

These instructions assume you have direct access to a Visual Builder instance. If you are using the instance behind a WAF or an API Gateway, skip the certificate-related instructions provided here (from Step 3 onwards) and follow the WAF or API gateway certificate instructions instead. See WAF Certificates or Setting Up Custom Domains and TLS Certificates for API Gateways

  1. Choose a custom hostname for your instance and register it at a DNS provider.
  2. Obtain an SSL certificate from a certificate authority (CA) for your hostname.
  3. In your OCI tenancy, select a compartment and create an OCI Vault to store the certificate. See Working with Compartments, Overview of Vault, and Create a New Vault.
    Note

    If you are using the instance behind a WAF, you don't need to store your certificate in a vault. You can skip this step and the next step (Step 4).

  4. Store the certificate as a secret in the OCI Vault. See Create a New Secret.
    Use the following certificate format:
    {
      "key": "-----BEGIN PRIVATE KEY-----\n…..-----END PRIVATE KEY-----\n",
      "cert": "-----BEGIN CERTIFICATE-----\n….-----END CERTIFICATE-----\n",
      "intermediates": [
        "-----BEGIN CERTIFICATE-----\n….-----END CERTIFICATE-----\n",
        "-----BEGIN CERTIFICATE-----\n….-----END CERTIFICATE-----\n"
      ],
      "passphrase": "<private key password if encrypted key is provided>"
    }
    Note

    • To avoid manual errors, you can also convert your PEM certificate into a single line containing "\n", as expected, with the following awk commands.

      For the leaf certificate:

      awk -v RS= '{gsub(/\n+/, "\\n")}1' <cert_pem_file>

      For each intermediate/root certificate:

      awk -v RS= '{gsub(/\n+/, "\\n")}1' <each_intermediate_cert_pem_file>

      For the private key:

      awk -v RS= '{gsub(/\n+/, "\\n")}1' <private_key_pem_file>
    • The latest version of the secret is used when you associate a custom endpoint with your instance either through the create instance or edit instance operation. For information on secret versions, see Secret Versions and Rotation States.
    • If you use a hostname certificate whose certificate authority (CA) is not in the Visual Builder trust store, you must also upload the certificate to your Visual Builder instance; otherwise, an exception is thrown in the scenarios the instance calls itself.
    Note the following certificate requirements:
    • If the certificate has more than one root/intermediate certificate, each certificate must be specified as a separate element in an intermediates array.
    • Always ensure that the final root CA is specified as the last element in the array. For example, if there are three intermediate certificates for the leaf certificate, the certificate that issued the leaf certificate should go as the intermediates[0] element, the certificate that issued the intermediates[0] certificate should go in the intermediates[1] element, and the certificate that issued the intermediates[1] certificate should go in the intermediates[2] element.
    • The passphrase attribute is optional and does not need to be specified if the private key is not encrypted.
    • If using an encrypted private key, the following format is required (PKCS1 is supported):
      -----BEGIN RSA PRIVATE KEY-----
      Proc-Type: 4,ENCRYPTED
      -----END RSA PRIVATE KEY-----
      

      A JSON file with an encrypted private key looks as follows:

      {
        "key": "-----BEGIN RSA PRIVATE KEY-----\nProc-Type: 4,ENCRYPTED\n....\n-----END RSA PRIVATE KEY-----",
      ..
      ..
        "passphrase": "<passphrase to decrypt the key>"
      }
      

      A JSON file with an unencrypted private key looks as follows:

      {
        "key": "-----BEGIN RSA PRIVATE KEY-----\nvRXUK08v31bw2rnDLw+vjuX2i8ujHWs\n....\n-----END RSA PRIVATE KEY-----",
      ..
      ..
      }
      
    • If your private key is in PKCS8 format, you must convert it to PKCS1 format:
      openssl rsa -in <input_pkcs8_encrypted_private_key> -out <converted_encrypted_private_key_file_name> -aes256
  5. Create an Identity and Access Management (IAM) policy to:
    1. Allow the Visual Builder service to read the version and contents of the secret.

      Here's the policy syntax for a Visual Builder service:

      allow group <group-name> to read secret-bundle in compartment <secrets-compartment>

      Here's an example:

      allow group VBInstanceAdmins to read secret-bundle in compartment MySecretCompartment

      If the VB instance is NOT in a default domain, then you need to include the domain prefix in front of the group name.

      Here's an example:

      Allow group mydomain/VBInstanceAdmins to read secret-bundle in compartment MySecretCompartment

    2. Allow the admin group to access the secret, key, and vault (or create a new secret, key, and vault), while creating or updating a Visual Builder instance with a custom endpoint.

      Here's the policy syntax:

      allow group <group-name> to manage secrets in compartment <secrets-compartment>

      allow group <group-name> to manage keys in compartment <secrets-compartment>

      allow group <group-name> to manage vaults in compartment <secrets-compartment>

      and here are examples:

      Allow group VBInstanceAdmins to manage secrets in compartment MySecretCompartment

      Allow group VBInstanceAdmins to manage keys in compartment MySecretCompartment

      Allow group VBInstanceAdmins to manage vaults in compartment MySecretCompartment

      If the VB instance is NOT in a default domain, then you need to include the domain prefix in front of the group name.

      Here are examples:

      Allow group mydomain/VBInstanceAdmins to manage secrets in compartment MySecretCompartment

      Allow group mydomain/VBInstanceAdmins to manage keys in compartment MySecretCompartment

      Allow group mydomain/VBInstanceAdmins to manage vaults in compartment MySecretCompartment

    Note that you should specify the resource to return in <resource-type>, as described in Details for the Vault Service.

    For the policy statement syntax, see Table 3-1 above, and CreatePolicy API Request.

  6. Create a Visual Builder instance and map the custom endpoint details to it. See Create the Visual Builder Instance and Map Your Custom Endpoint with Your Visual Builder Instance.
  7. Finally, update the custom endpoint DNS record to the original instance hostname. As a best practice, update the CNAME of the DNS record with the hostname of the original instance endpoint.