Scheduling Data Science Job Runs
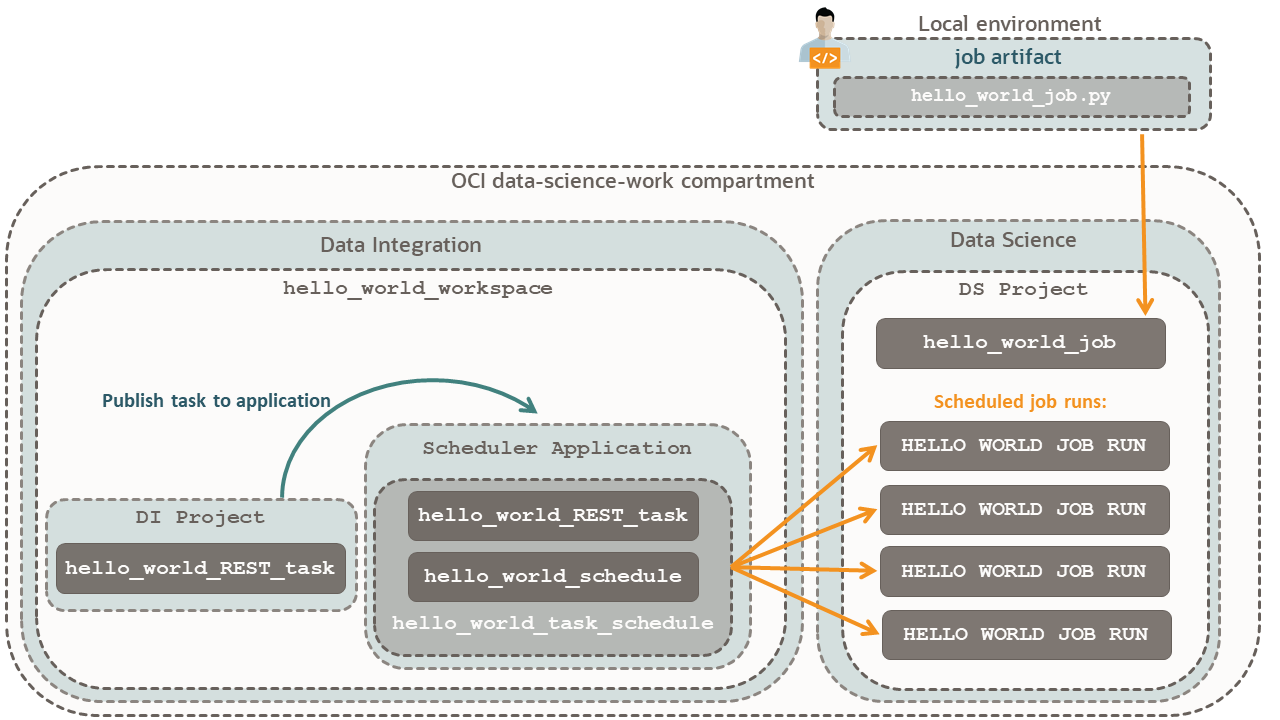
In this tutorial, you use Data Integration to schedule job runs for your Data Science jobs.
Key tasks include how to:
- Create a job with a Data Science job artifact.
- Set up a REST task to create a job with the same specifics as the job created with the artifact.
- Set up a schedule and assign it to the REST task.
- Have the task scheduler create the Data Science jobs.

Before You Begin
To successfully perform this tutorial, you must have the following:
-
A paid Oracle Cloud Infrastructure account, or a new account with Oracle Cloud promotions, see Request and Manage Free Oracle Cloud Promotions.
- A MacOS, Linux, or Windows computer.
1. Prepare
Create and set up dynamic groups, policies, a compartment, and a Data Science project for your tutorial.
Perform the Manually Configuring a Data Science Tenancy tutorial with the following specifics:
If you have performed the Manually Configuring a Data Science Tenancy before, ensure that you read the next steps and incorporate the policies that apply to this tutorial.
Allow the Data Integration service to create workspaces.
In this step, you add Data Integration workspaces to the
data-science-dynamic-group. The
data-science-dynamic-group-policy allows all members of this dynamic
group to manage the data-science-family. This way, the workspace resources
such tasks schedules can create your Data Science jobs.
2. Set Up a Job Run
Create a hello world Python job artifact to use in your job and
job runs:
Run the hello_world_job:
When you create a job, you set the infrastructure and artifacts for the job. Then you create a job run that provisions the infrastructure, runs the job artifact, and when the job ends, deprovisions and destroys the used resources.
-
In the
hello_world_jobpage, click Start a job run. -
Select the
data-science-workcompartment. -
Name the job run,
hello_world_job_run_test. - Skip the Logging configuration override and Job configuration override sections.
- Click Start.
- In the trail that displays the current page, which is now the job run details page, click Job runs to go back and get the list of job runs.
- For the hello_world_job_run_test, wait for the Status to change from Accepted to In Progress, and finally to Succeeded before you go to the next step.
To use the hello_world_job for scheduling, you need to prepare some
information about the job:
3. Set Up the Task
For a visual relationship of the components, refer to the scheduler diagram.
Create a workspace to host a project with a task that creates job runs.
This workspace uses datascience-vcn, and the Data Science job that you created uses the Default networking option that Data Science offers. Because you have given the Data Integration service access to all resources in the data-science-work compartment, it doesn't matter that the VCNs differ. Data Integration has a scheduler in datascience-vcn, creating job runs in the Default networking VCN.
In the hello_world_workspace, update the system-generated project
name.
You change the project name to be clear that this project is a Data Integration project, and not a Data Science project.
Create a task and define the REST API parameters for creating a job run.
After the workspace shows that REST task created successfully, click Save and Close.
In the Request body of your REST task, you assign values to the parameters needed for creating a job run. You use the same values as the
hello_world_job you created in
Data Science in the Create a Job section of this
tutorial.References:
Create a scheduler application that runs your REST task on a schedule.
-
In the
hello_world_workspaceworkspace, in the Quick actions panel, click Create application. -
Name the application,
Scheduler
                        Application
. - Click Create.
Add the hello_world_REST_task to the Scheduler
Application:
-
In the trail that displays the current page, navigate to the
hello_world_workspaceworkspace and the click the Projects link. - Click DI Project.
- Click Tasks.
-
In the list of Tasks, click Actions menu for
hello_world_REST_taskand then click Publish to application. - For Application name, click Scheduler Application.
- Click Publish.
Before you schedule the hello_world_REST_task, test the task by
manually running it:
Check that the Data Science Job runs displays the task you ran from Data Integration.
4. Schedule and Run the Task
Create a schedule to run the published
hello_world_REST_task.
- In this step, you set up a schedule in the
Scheduler Application.In the next step, you associate the schedule with thehello_world_REST_task.
Reference: Scheduling Published Tasks
Assign the hello_world_schedule to the published
hello_world_REST_task:
Check that the Data Science Job runs displays the scheduled task from Data Integration.
After you receive one or more jobs runs, you are done with this tutorial. You can now disable the scheduler and stop new job runs.
-
In the
hello_world_workspace, click Applications and thenScheduler Application. - In the left navigation panel, click Tasks.
-
Click
hello_world_REST_task. -
In the list of task schedules, click
hello_world_REST_task_schedule. - Click Disable.
- In the confirmation dialog, click Disable.
- If you created more than one task schedule for this tutorial, then disable all of them.
What's Next
You have successfully scheduled Data Science job runs.
To learn more about Data Science jobs, see the following sections in the Data Science documentation:
To learn more about Data Science, check out the Data Science Tutorials and Data Science Learning Videos.